
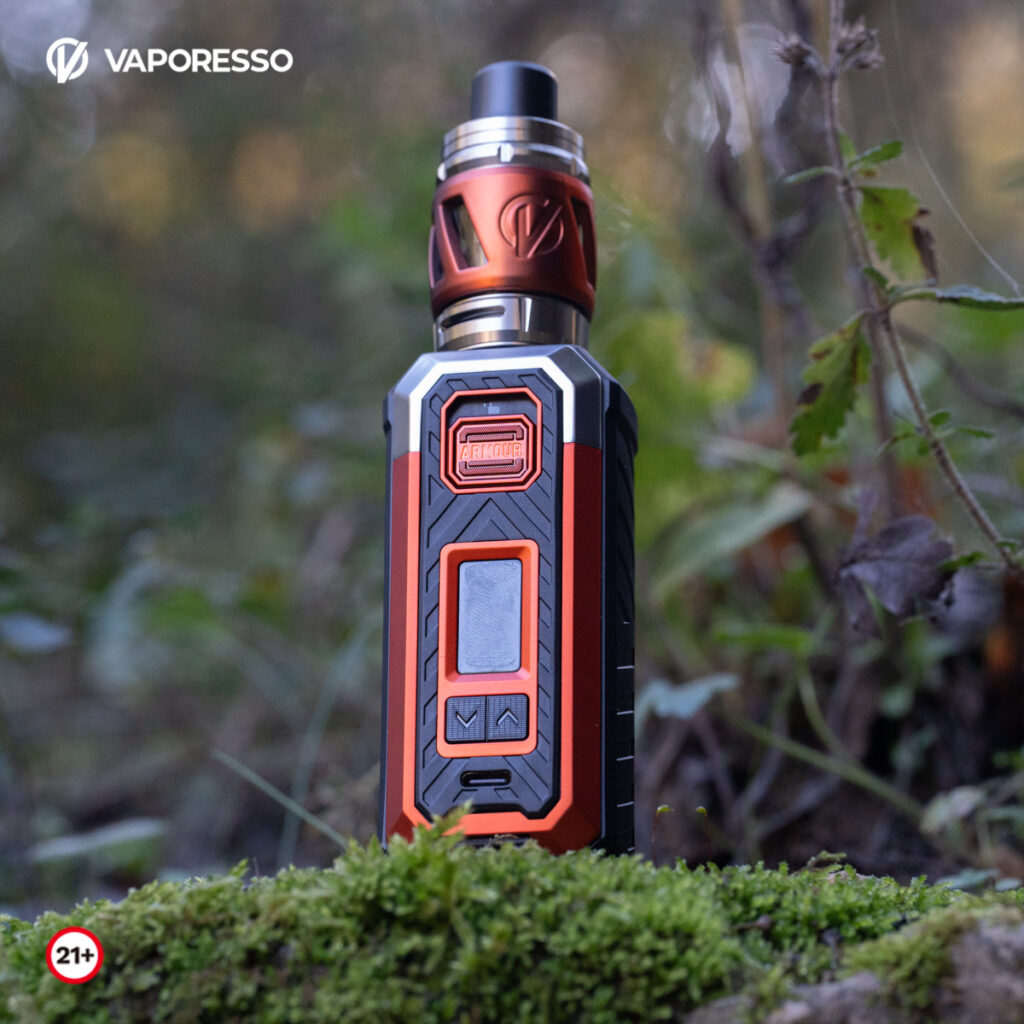
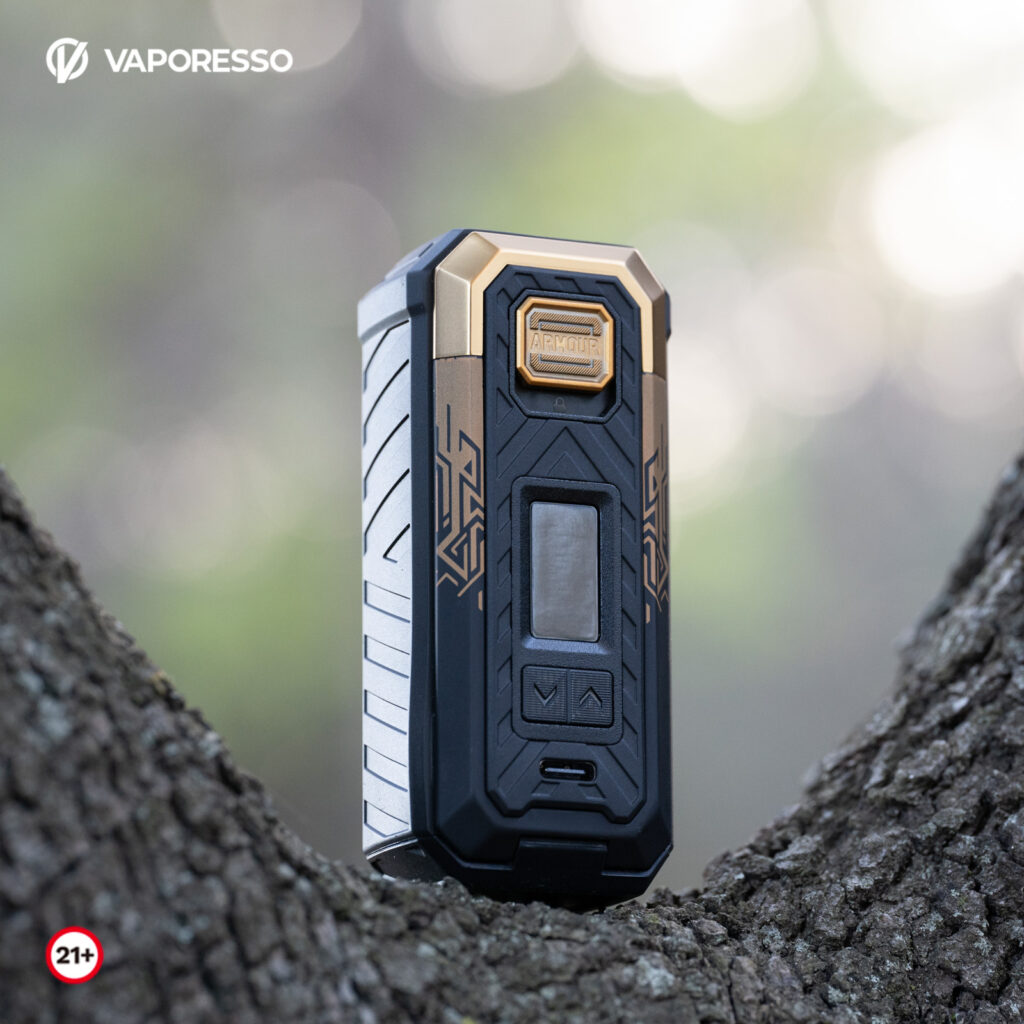
Hello! Today we’ll be taking a look at the Vaporesso Armour S mod. The Vaporesso Armour S kit was released simultaneously with the Armour Max kit which is the bigger dual 18650/21700 220W device you see on the right. This review will focus mostly on the smaller compact 100W Armour S mod (without the iTank 2) shown on the left in the back. Unfortunately, Vaporesso did not create a page dedicated solely for the Armour S kit or mod, but their similarities do closely align them in many ways. In fact, the only things that really set them apart is the single and dual 18650/21700 external battery capabilities, and in turn their dimensions. This does add things to consider when deciding between which one better suits your needs, and I’ll be going over a bit of that in this review.
I want to thank Sue over at HealthCabin for sending the Armour S out for review. Per norm, this critique will be conducted in a fair and honest manner.
I also encourage you to take a look at both the Armour S mod and Armour S kit over at HealthCabin. The kit includes the new iTank 2 which use the same great GTi coils as the original iTank and should be heavily considered if you’re also interested in a great tank.
⇒ Site Overview ⇐
- Ruggedness
- Innovative Physical Lock
- Innovative Battery Latch
- F(t)
- Pulse
- Eco
- TC (Ti, SS, Ni)
| Battery Capacity: | 1 * 21700 or 18650 High Amp (CDR) Battery (Not Included) |
| Output Power: | 5-100W |
| Charging Current: | DC 5V/2A, Type-C |
| Display: | 0.96 inch TFT Screen |
| Dimensions: | 95mm (h) * 42mm (w) * 37mm (d) |
⇒ Test Results & Observations ⇐
INTRO
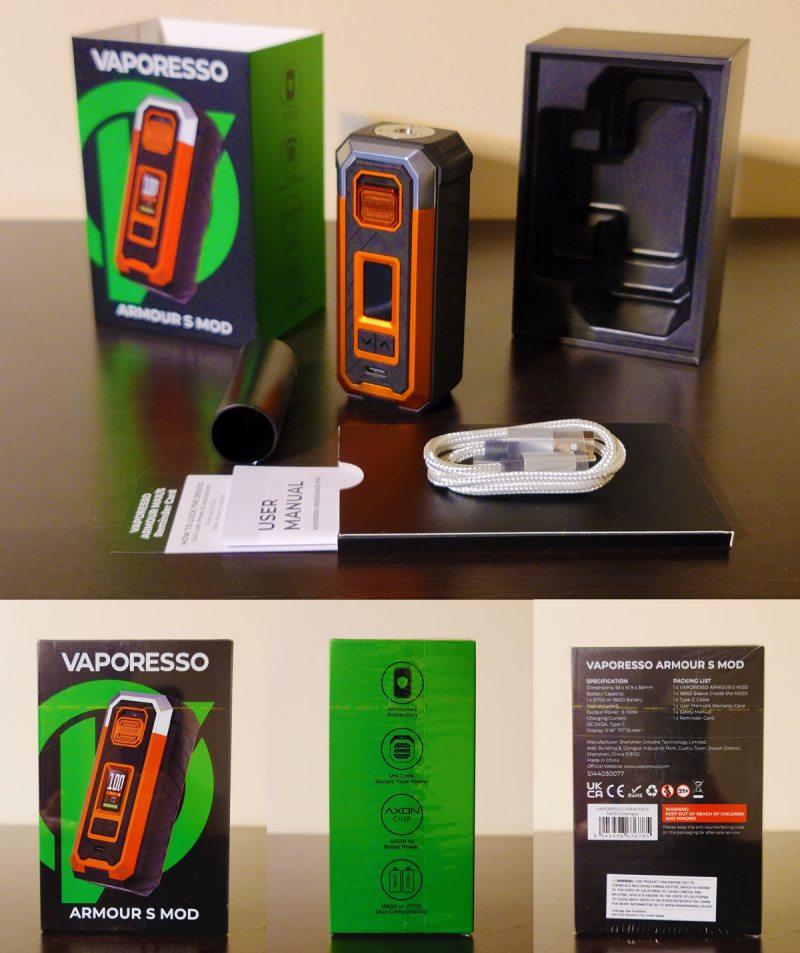
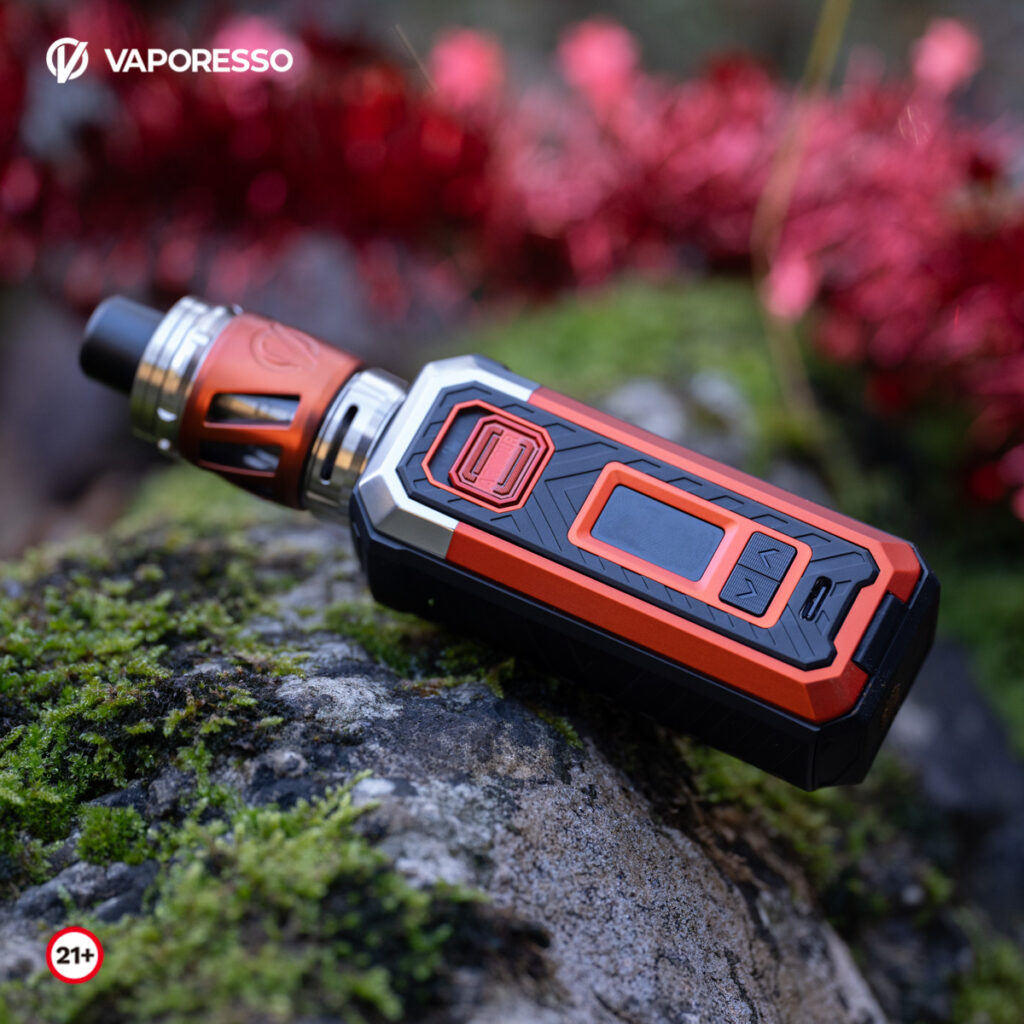
The Vaporesso Armour S Mod came packaged quite nicely. A plastic insert cradles the mod and the USB-A to Type-C cable that come in box that should tolerate most transit handling that doesn’t completely crush the package. I received the orange colorway as you can see, and it’s quite vibrant. The 18650 battery sleeve adapter is stored inside the mod, so don’t feel like you got cheated on this accessory when you open the box.
I’d recently received the dual battery Armour Max kit for review and other than the size and weight, both of these devices are very similar and should be able to handle almost anything you throw at them, but literally and figuratively.
THE EXTERIOR
Much of the Armour S is made with a TPU material that’s classified as a plastic, but behaves much like rubber which gives this device a bit of additional ruggedness over most other mods with maybe the exception of the GeekVape L200 Classic. Both are certainly not indestructible by any means, but this added protection is a highly weighted selling point in my eyes and should be taken into consideration if you’re looking for a 21700 battery compatible mod.
More or less anything you see here in black other than the Up and Down buttons located under the 0.96″ TFT display is TPU. With a 42mm width and 37mm depth, this device is boxy, but they did a good job of using what little depth they had to add the chip while also being able to recede the UI screen so that it’s further away from the point of impact if this device were to land on the screen side when dropped.
The orange and silver portions that are not TPU look to be made of a sandblasted Zinc-alloy and should further add to the resilience of this device. The beveled corners on pretty much every side of the Armour S gives it a very comfortable hand-feel despite being a bit chonky.
The fire button, UI display, up and down buttons, as well as the USB Type-C port can all be found on the front side of the mod. The battery hatch release button is the only interactive part found on the back, which sits just below the vertical VAPORESSO logo most noticeable by its slotted knurling. Despite the slotted knurling making it look like you should slide the button, you simply need to press it in to release the battery door located on the bottom.
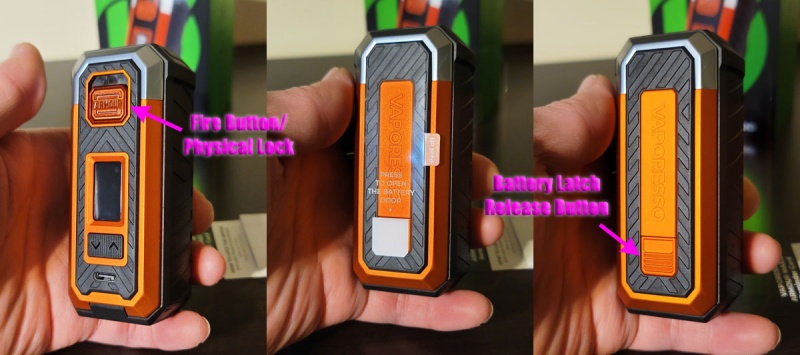
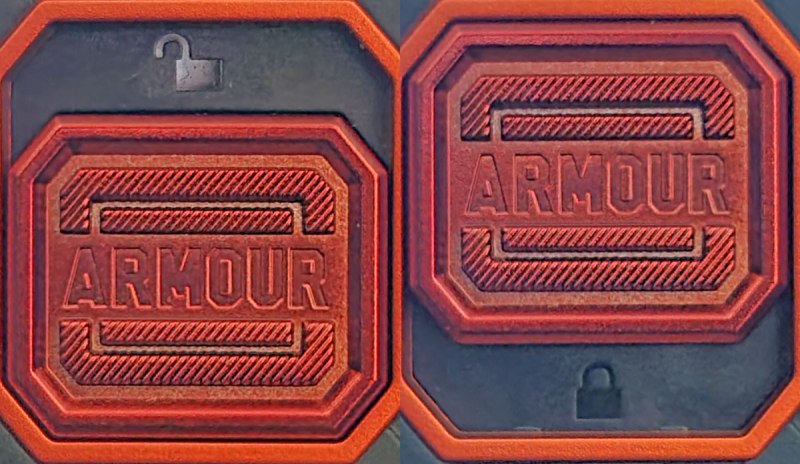
The fire button doubles as a physical lock to disable the device from firing. You are still able to make wattage adjustments with the fire button locked. To lock the entire device, press both the up and down buttons for 1 second to completely lock the UI from being fired or altered. There are small symbols both above and below the fire button to let you know whether it’s locked or not.
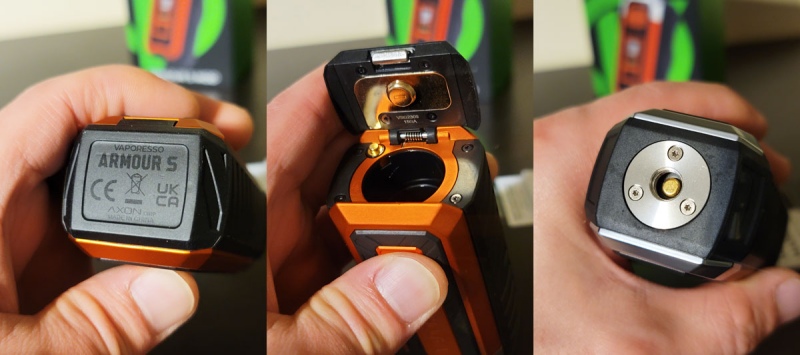
The aforementioned battery latch release button does exactly that. The button presses in a spring-loaded latch located on the battery door which is found on the bottom of the mod, exposing the battery compartment. The battery door itself is pretty springy and latches back in solidly with a satisfying click. Both a single 21700 or 18650 (use provided adapter) HIGH AMP CDR (continuous discharge rating) battery can be used in the Armour S. I would suggest a 21700 battery if you have them, as they generally provide roughly 1.6x the battery life of an 18650 depending on the actual CDR (not what’s advertised) and capacity.
The top of the Armour S has a gold/brass-plated spring-loaded 510 pin secured into place with 3 size 5 Torx screws. The 510 plate itself is sealed quite well, being that the TPU runs underneath the plate giving it some sealing resistance against juice leaks and the likes. It’s never a bad idea to unscrew this plate to wipe out any residual moisture that may end up underneath it from time to time, but make sure you keep very good track of the screws because they’re very small.
The depth of the device and the beveled corners are the limiting factors when it comes to tank diameters before getting “overhang”. The rubber begins to bevel at 23mm and the edges of the TPU extend to 26mm. Any tank diameter larger than this will have a noticeable overhang extending past the aggressive beveling.
THE UI
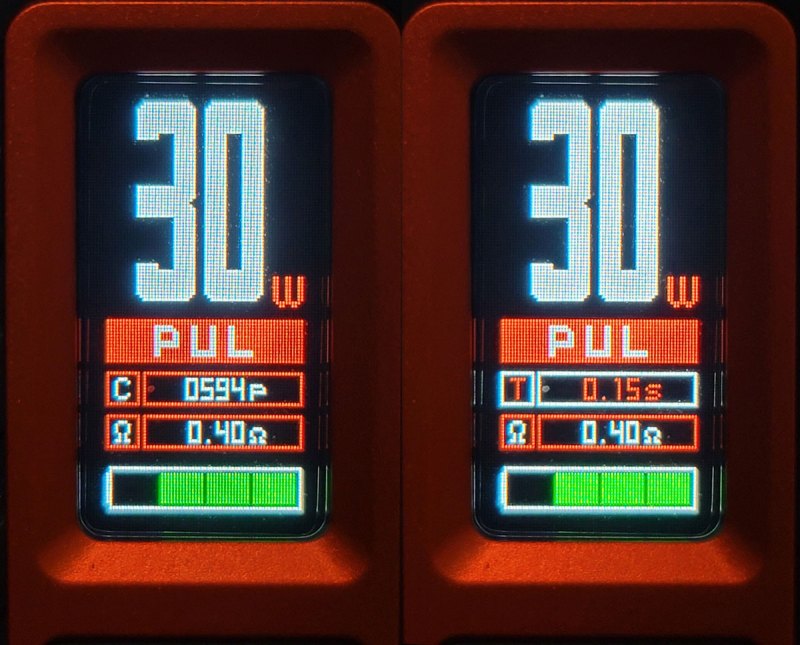
The Axon chip has been changed from previous iterations in terms of how the UI is laid out. To me, they left out some valuable information in the display, but the chip itself functions pretty much like any previous Vaporesso mod which are usually easy to navigate, easy to operate, and great performers. Therefore, I’m not going to go too in-depth with every function, but I will provide you with the basics.
The wattage ranges from 5 to 100W in single watt increments and does not round-robin. The scroll speed is fast, but not so fast that it’s impossible to make 5 or 10W changes. Some mods accelerate the scroll speed so fast that you’re forced to continuously single press to make these finer adjustments, and single presses are sometimes in 0.1W increments. That can be very cumbersome and annoying, and if you have a mod that does this, you know what I’m talking about. Vaporesso did a great job of finding a satisfactory point with all of these aspects in mind.
In pinches when you need to use the charging port, the Armour S does charge at 1.6-1.7A and supports pass-through vaping.
Shortcut key combos are as follows
- Down + Fire Button (Hold): Enables/disables Smart Mode
- Down + Up (Hold): Locks Down and Up buttons
- Down + Up + Fire Button (Hold): Shows the chip version
- Up + Fire Button (Hold while in a TC Mode): Allows wattage adjustment up to 80W
- Down + Fire Button (Hold while in TC Mode): Locks coil resistance
- Fire Button Pressed 5x: Turns mod on/off
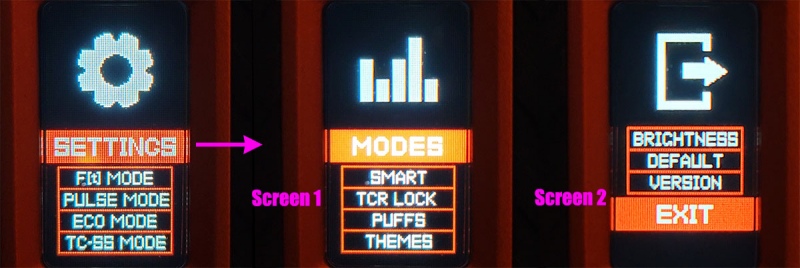
- Fire Button Pressed 3x: Access to menu options
Menu Options are as follows
- SETTINGS: Allows various adjustments to Smart Mode (on/off), TCR Lock, Puff Counter, Color Theme, Brightness, and other minor things.
- F(t): Rapidly oscillates the wattage to activate different flavor notes
- PULSE: Slightly slower oscillation in wattage to activate different flavor notes
- ECO MODE: Constant wattage at mod setting
- TC-SS MODE: Temp. Control for Stainless Steel
- TC-NI MODE: Temp. Control for Nickel
- TC-TI MODE: Temp. Control for Titanium
(TCR values for each TC mode are predefined and unable to be adjusted)
Like most Vaporesso mods, the Axon chip does apparently have a step-up converter, aka a “boost” even though there’s no mention of it the specs which I think is Vaporesso doing themselves a disservice. The purpose of a boosted chip is to enable a mod to achieve a higher voltage output than what a fully charged 4.2V lithium-ion battery has to offer. In this case, the boost would allow the Armour S to achieve voltages higher than 4.2V with a single battery. In the case with the Armour Max which is the dual battery version of the Armour S, it allows voltages above 8.4V (4.2V+4.2V for 2 batteries) which is capped at 9V of total output voltage. While the voltage output is not disclosed in any of the information I looked through for the Armour S, I don’t have definitive numbers to offer you. Furthermore, without a voltage readout on the UI, I cannot test it for results, either. I will however verify the mod’s capability of firing a 0.8 ohm coil with ease, which would lead me to believe that this Axon chip likely carries the same capabilities as the Vaporesso Target 100 mod which has a 9V cutoff. What all of this boils down to is, this mod will not come up short for MTL or DL (high and low resistance coils) users.
Many people consider the F(t) and Pulse Modes to be rather hoaky, but if you have sensitive taste buds, you can and will notice a slight difference in the vapes. Flavor additives reach their peak output at different temperatures, and by oscillating the wattage output slightly, there’s a chance to hit more of these flavor peaks in a single puff. This is more prevalent in juices that have a combination of a variety of flavor types such as savory desserts or custards, fruits, tobaccos, and/or menthols.
There are only a few things I see that would be obvious improvements with this Axon chip and the first of them is no voltage output reading on the display. There’s certainly enough room to have added it somewhere; I’d have even taken it instead of the puff counter, but I might be in the minority on this one.
The second thing is, like the Armour Max, the down and up buttons seem to be in the correct orientation when looking at the device, but it’s a bit counterintuitive when making adjustments on the mod. Generally speaking, the left button is usually a left-pointing arrow and the right button a right-pointing arrow. When navigating vertical menus, left usually brings you up in the menu, and right usually brings you down in the menu. It is indeed the opposite on the Armour S with the down arrow on the left and the up arrow on the right. It takes a bit of getting used to, but it’s only a minor thing I noticed. Functionally, the UI is very easy to understand and operate.
⇒ Conclusion ⇐
There’s certainly a lot more to like about the Armour S than to dislike; especially as a full kit with the iTank 2. The main appeal is obviously the ruggedness which is always a huge bonus for mods that are otherwise quite fragile. This becomes even more vital in newer devices that continue to use aluminum-alloys and plastics in their frames and assemblies. If I had to choose the greatest of three evils to protect against (dust ingress, water ingress, or fall protection), I would certainly choose fall protection every time. Keep in mind that IP-ratings only apply to dust and water/moisture ingress, and have nothing to do with fall protection.
Because the Armour S is a single battery device, the potential for fall damage is going to be less than a dual battery device like the Armour Max simply because it’s the lighter of the two. While the TPU will help with fall protection, this defense is not impenetrable. If fall protection is your biggest concern, then the Armour S wins in that category.
If you have trouble getting a resistance reading from the tank, be sure to change Smart Mode in the menu options to “ON”. You can change this back to “OFF” once it starts reading a resistance, but this might be required initially when screwing in a tank for the first time.
Overall, if you’re in search of an affordable single 21700 capable mod with a great hand-feel and bit of added ruggedness to boot, the Armour S is something that should be on your radar. Even more so as a kit, because the iTank 2 is an absolute win all around.
++ Pros ++
- Very nice hand-feel, although a bit chonky
- TPU offers great fall protection
- Compatible with single 2×700/18650 external batteries
- Innovative battery hatch button release
- Innovative physical locking fire button
- Easy UI to understand and operate
- Boosted chip (verified, but voltage cap unknown)
- Type-C charging at 1.6-1.7A (don’t recommend doing, but capable)
– – Cons – –
- Coil resistance may need Smart Mode ON to get a reading
+- Considerations -+
- It’s beefy for a single battery mod, but comfortable
- Down and up buttons are a bit counterintuitive
- Missing voltage and amp readouts in UI
- Not IP-rated
OVERALL RATING
9.0
And that about wraps up this review on the Vaporesso Armour S mod. It hits pretty much all the marks that I look for in a single battery mod with a few minor gripes. It’s a solid performer and you should have confidence in this device if you’re hesitating. The mod without the iTank 2 can be found here. As a kit with the iTank 2 (which I highly recommend), you can find it here. Be sure to log in or create an account at HealthCabin to see the best prices available.
Hopefully I covered everything you’d be interested in knowing about the Vaporesso Armour S mod. Feel free to reach out if you have any questions.
This review was written by Zach == Z-Lee from ECF, click to view original review there with more photos and more details.


